Desk Console Make-Over

Hi everyone!

It’s Fun Project Friday!

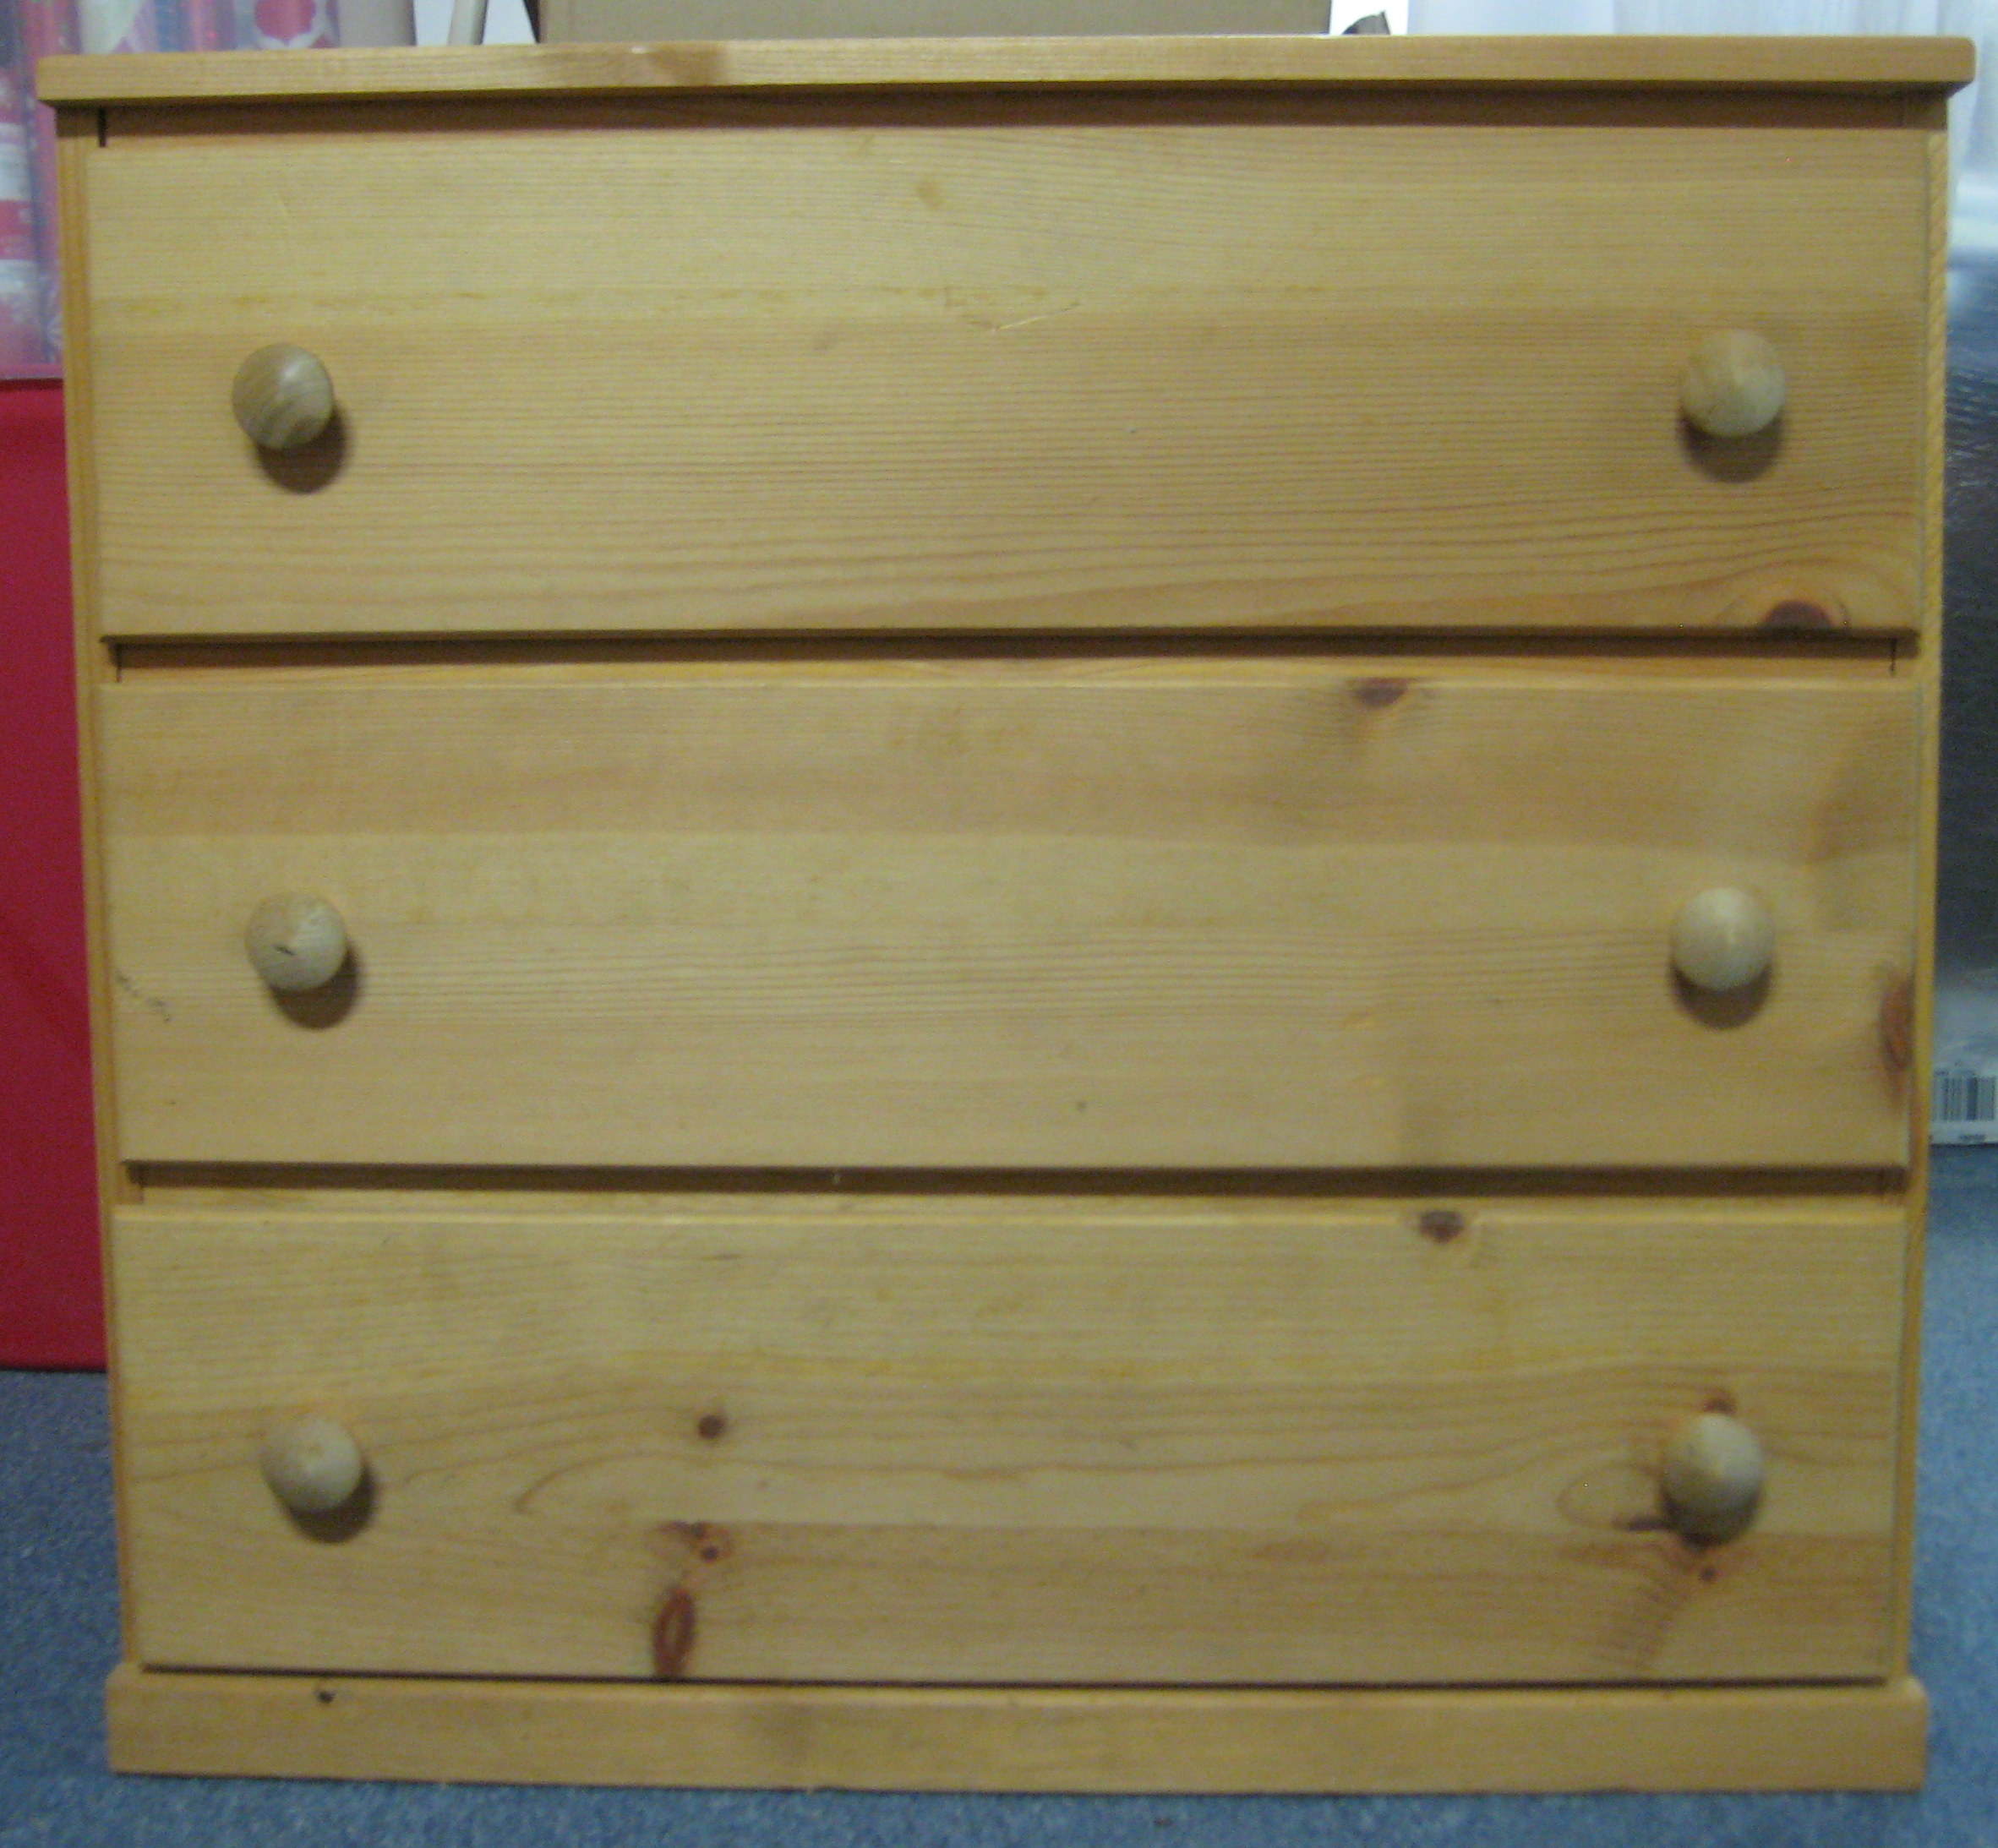
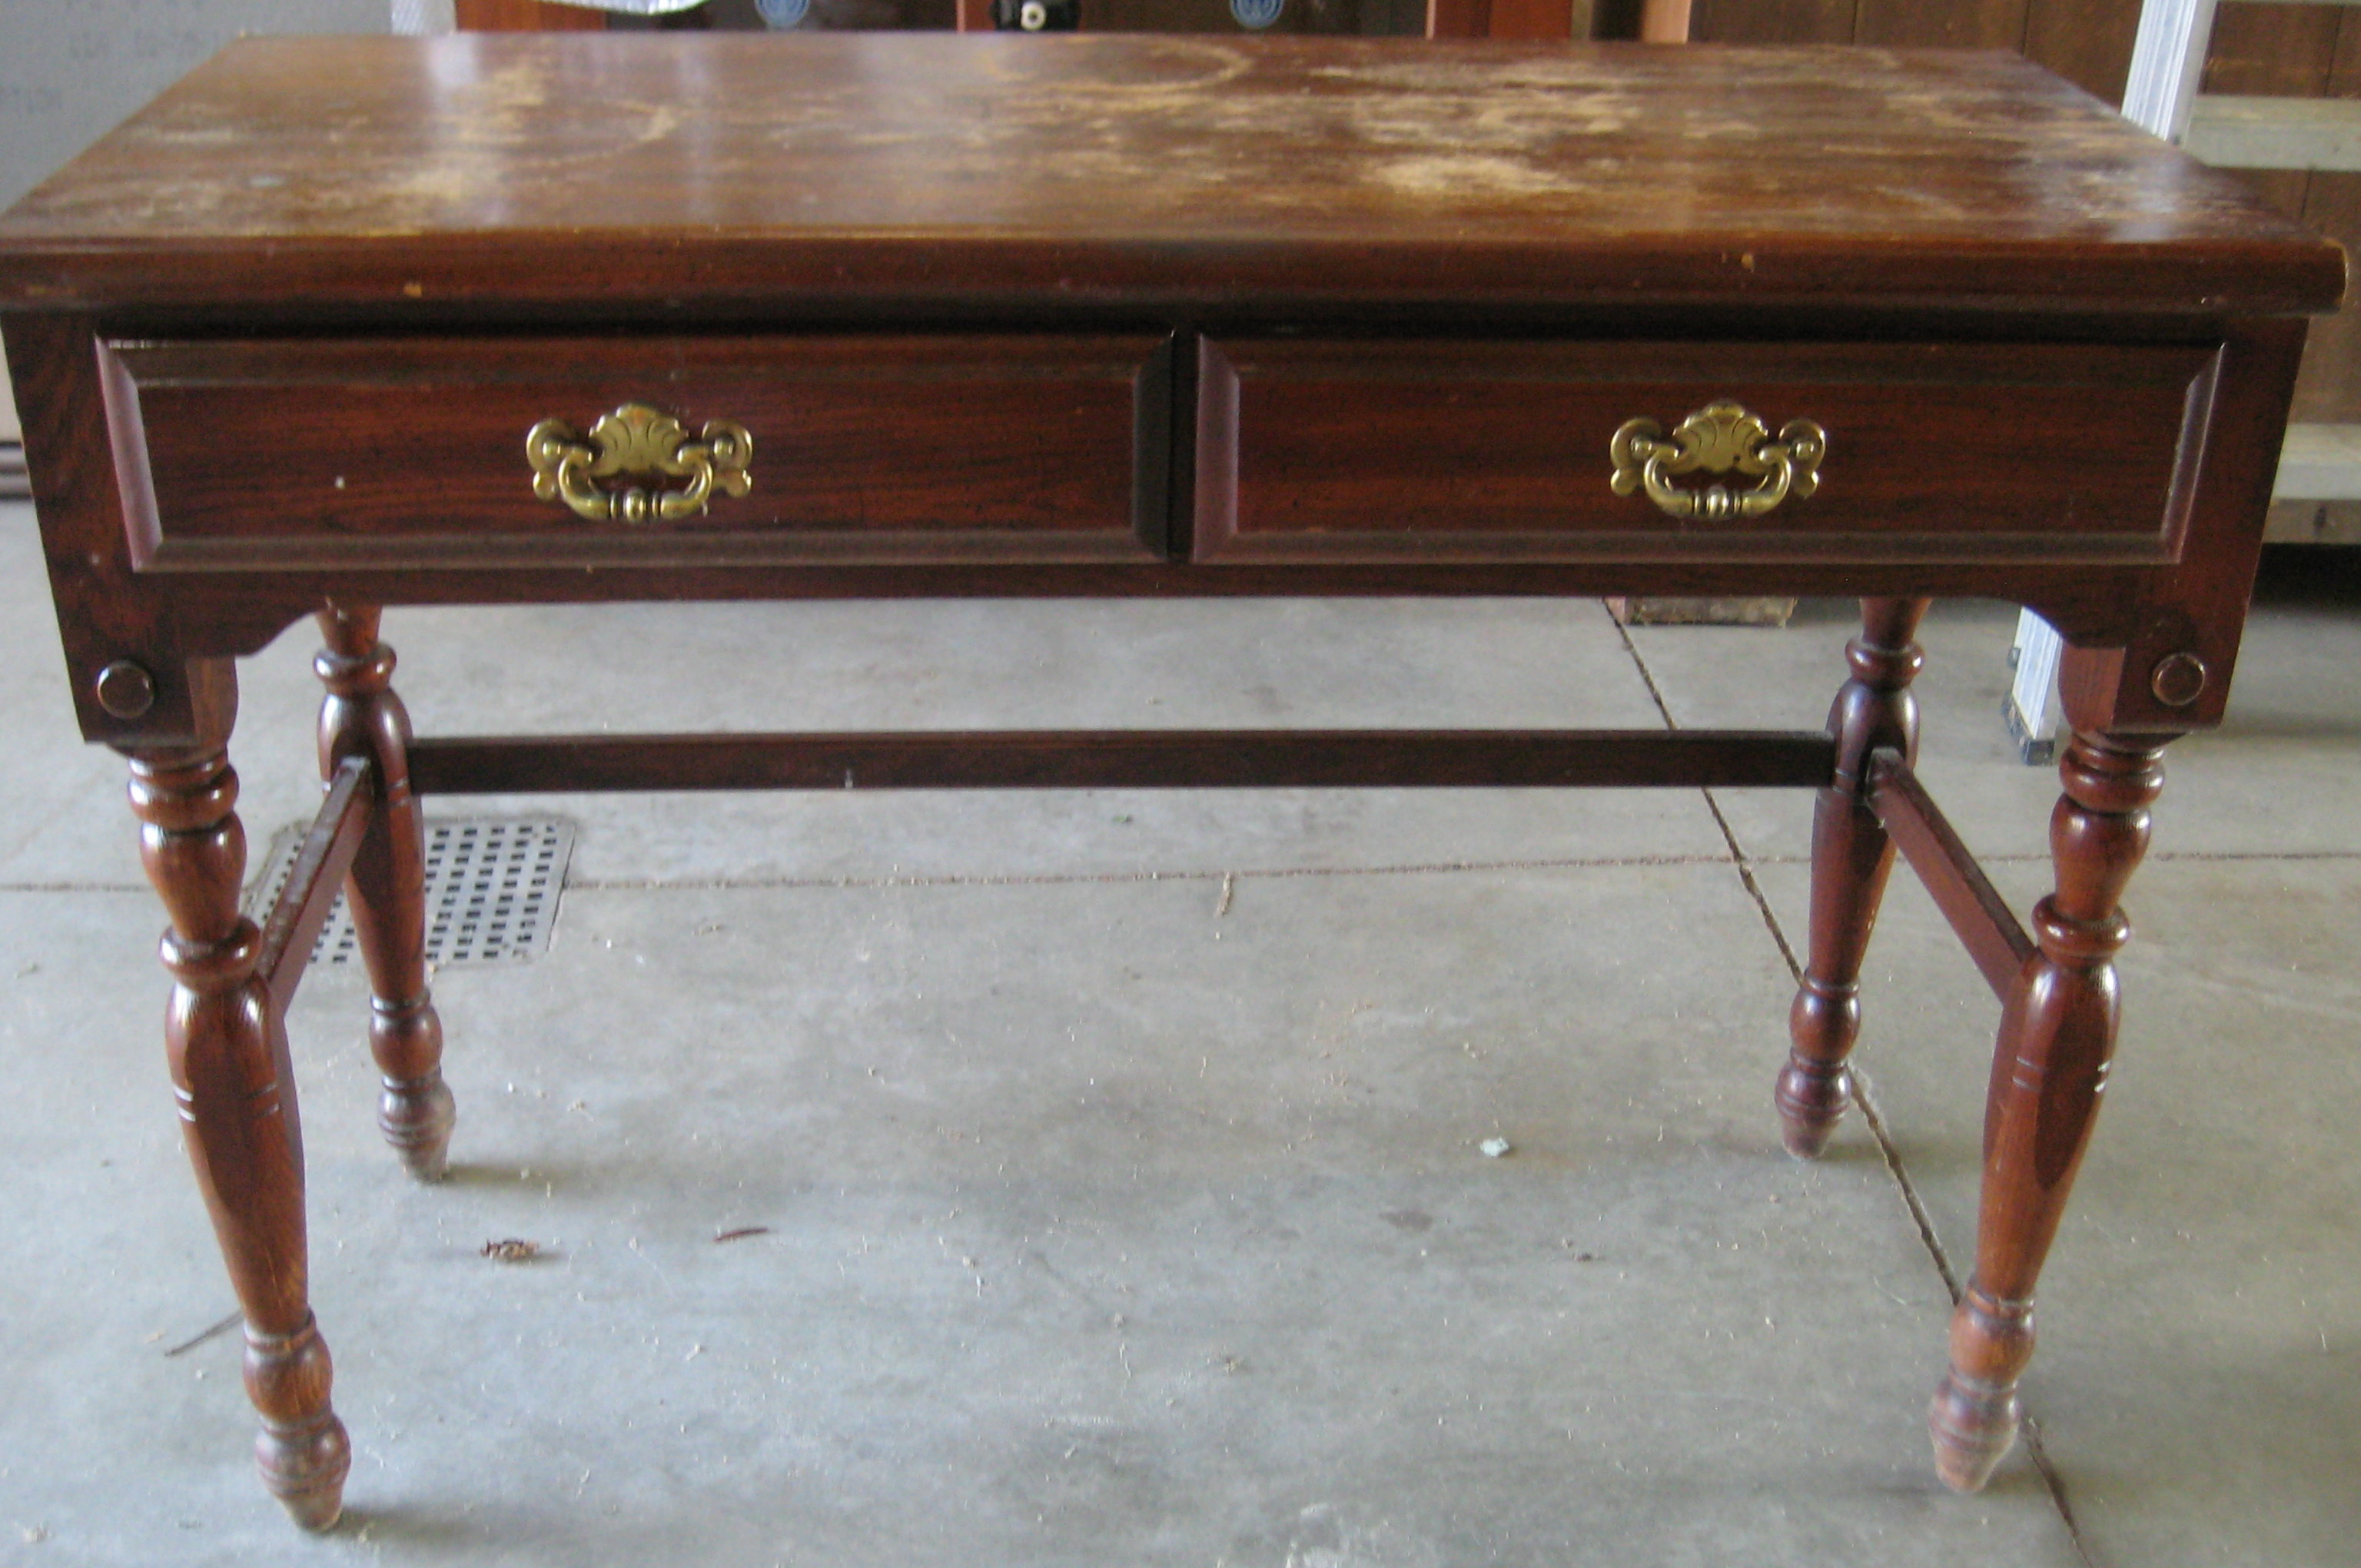
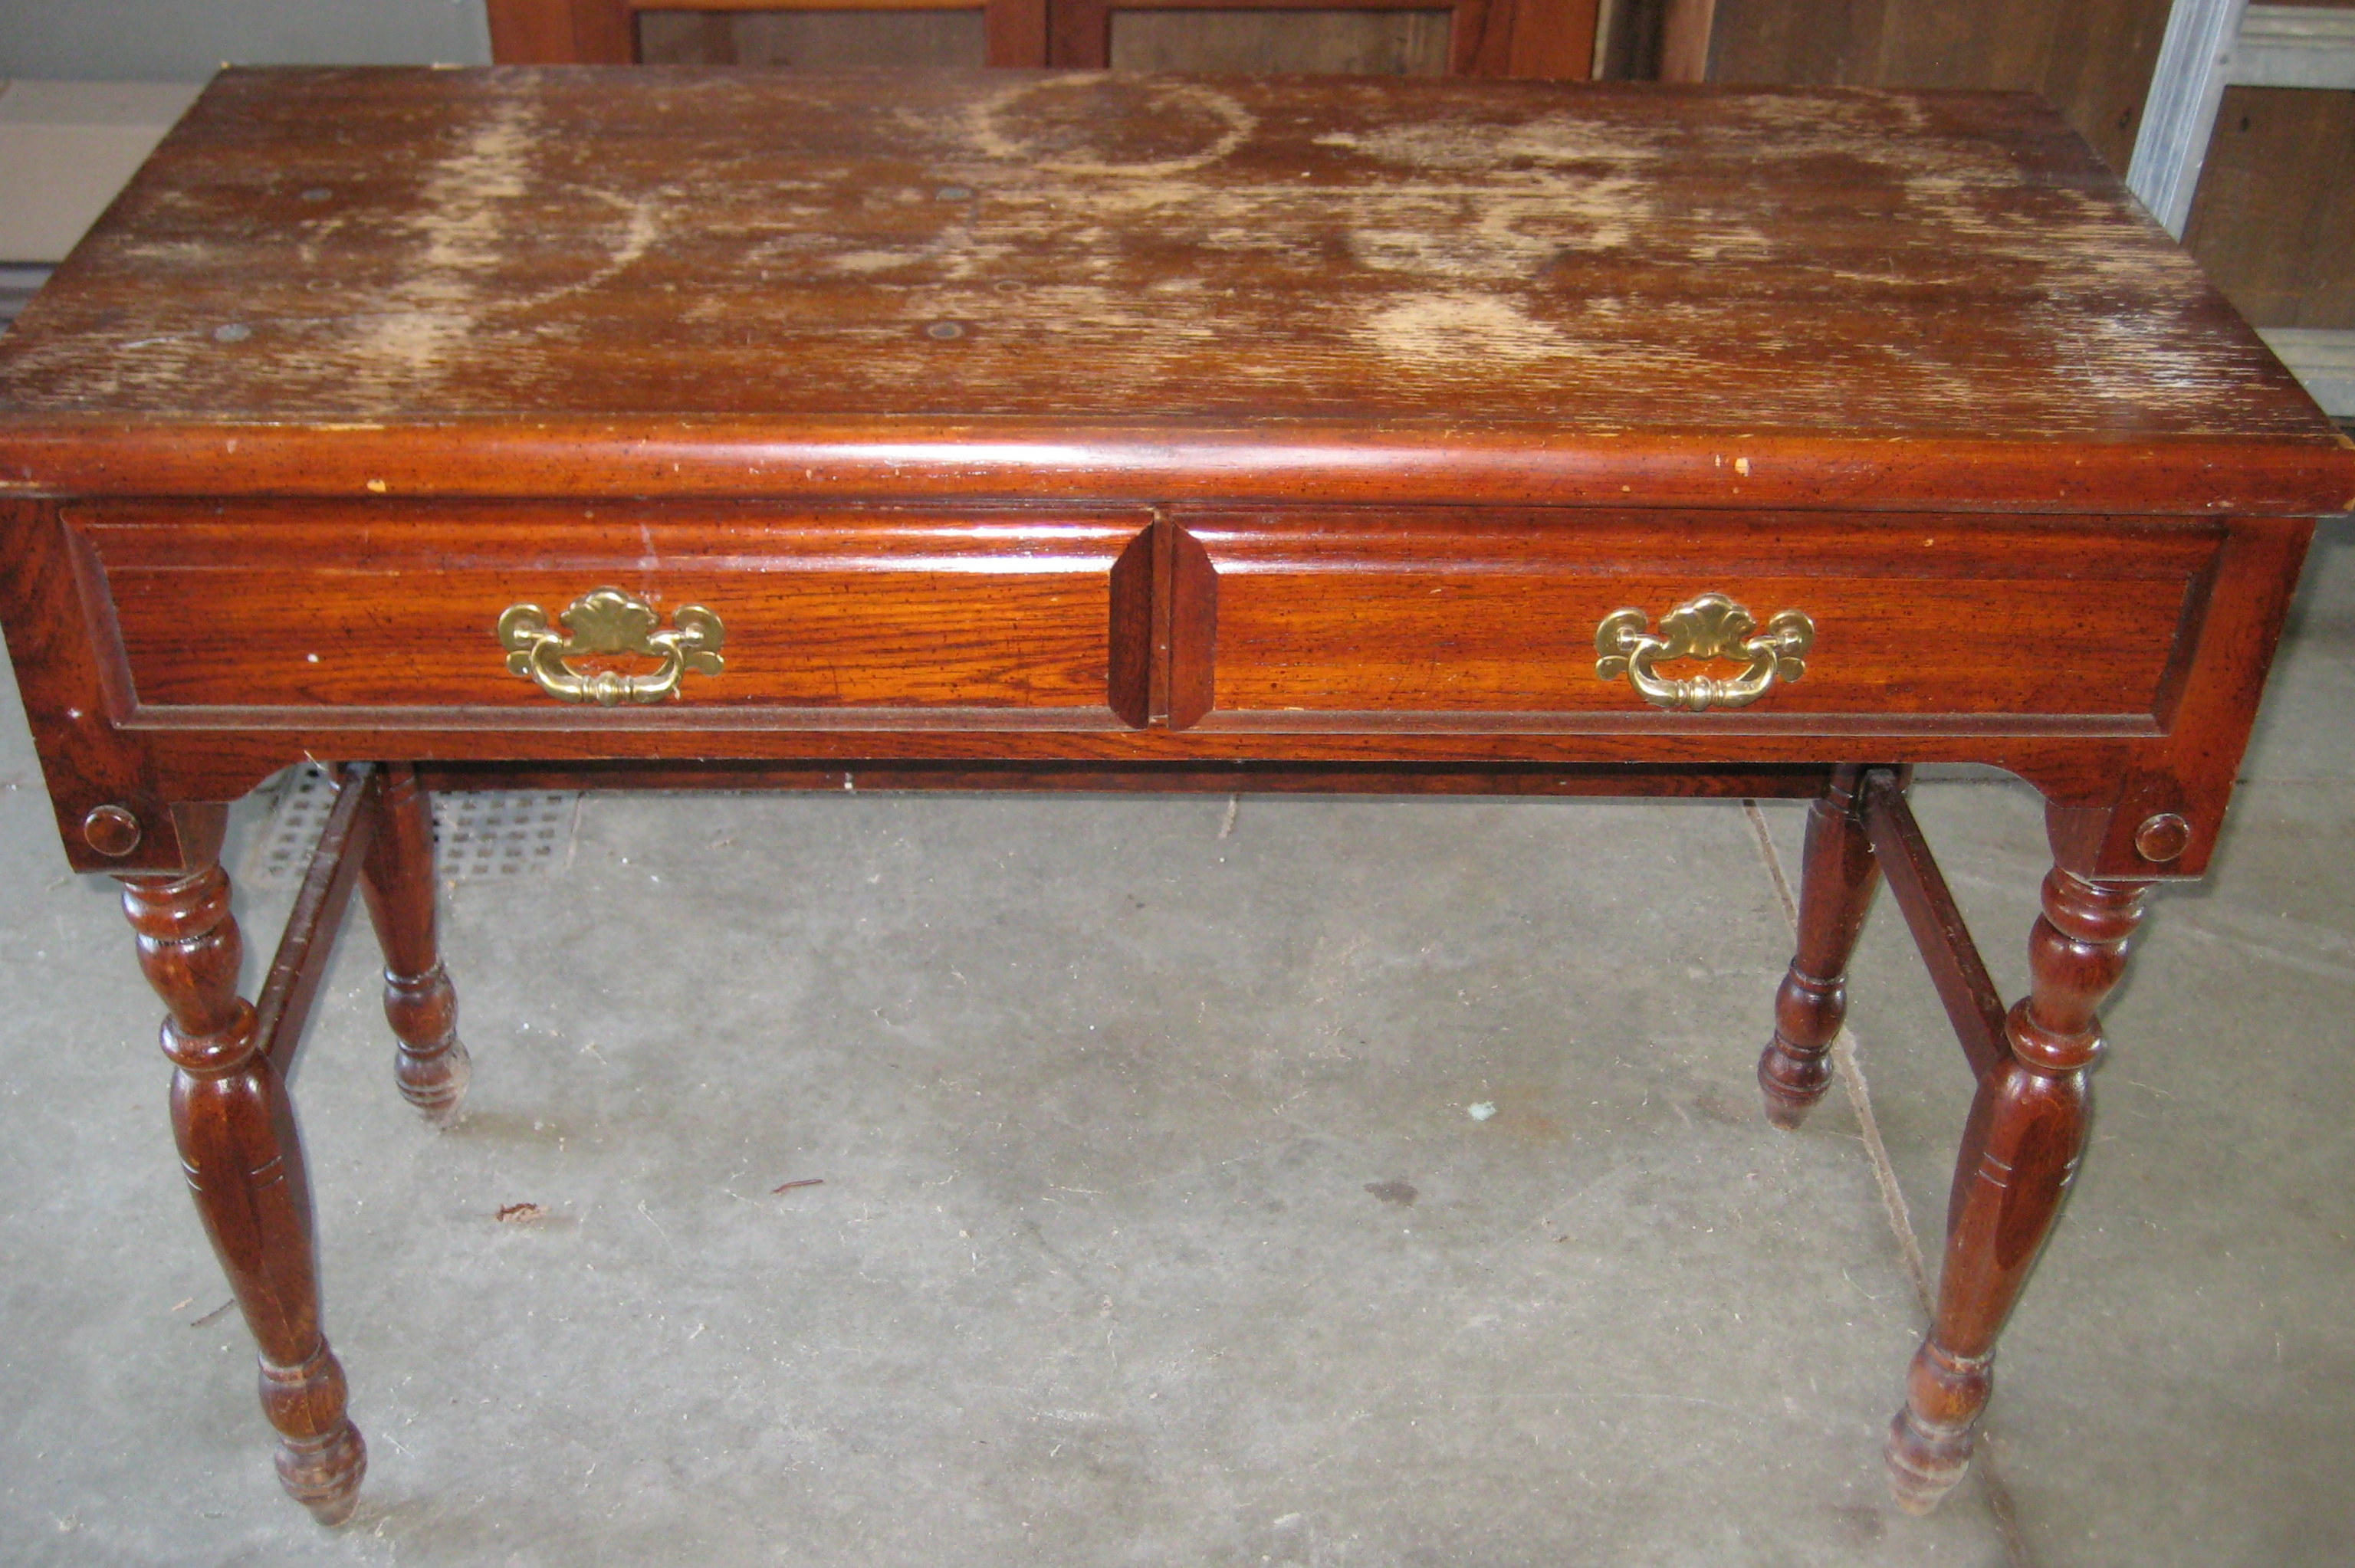
Well here it is… another piece of furniture that I picked up at a rummage sale… apparently just because THAT’S what project junkies DO!

I swear… it started calling my name before I even got out of the car! As soon as I walked up to it, I knew it would make a really cute console for an entryway (even though I didn’t even HAVE an entryway at the time!), and I just had to have it!

As you can see by the pictures below, the top was definitely in need of some TLC, but overall it was a pretty solid piece of furniture.

Desk- Before

Desk Before

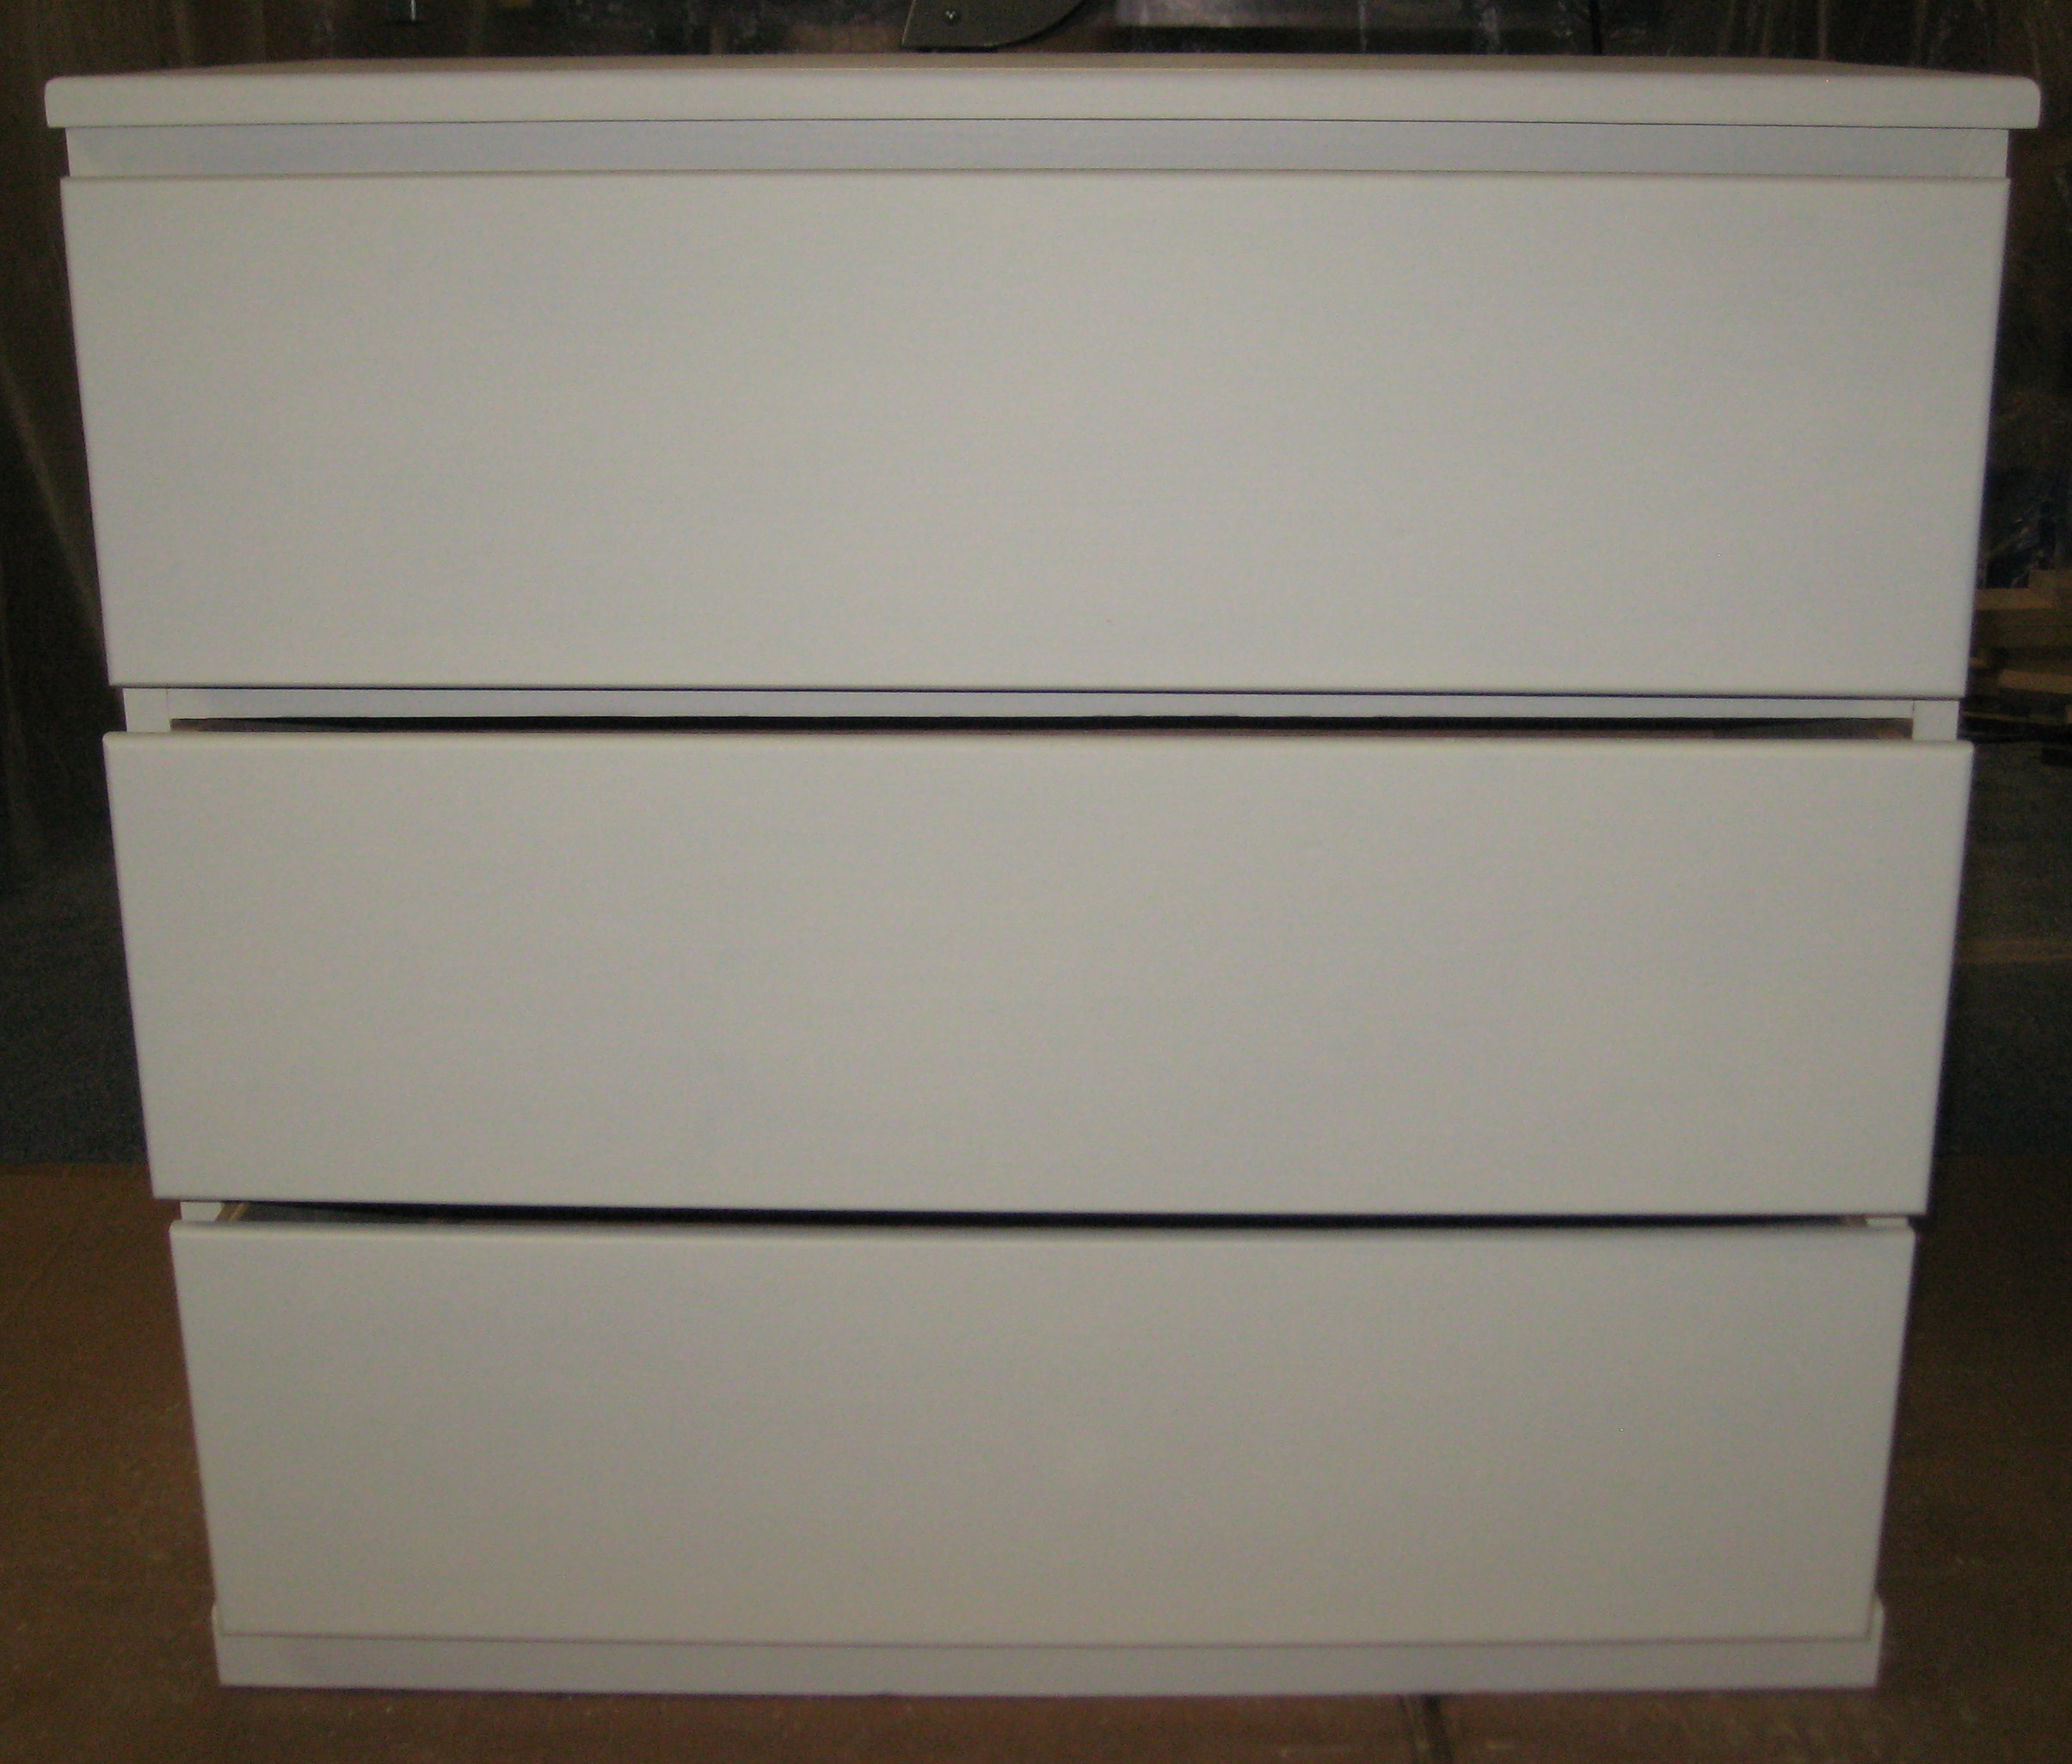
I was afraid that the previous water damage was too engrained in the wood to be able to accept stain evenly, so I opted to paint the entire desk. I gave the whole thing a good cleaning, removed the hardware, and lightly sanded the top of the desk to even out any high spots.

I was so engrossed in this project, that I forgot to take pictures of each step…sorry!

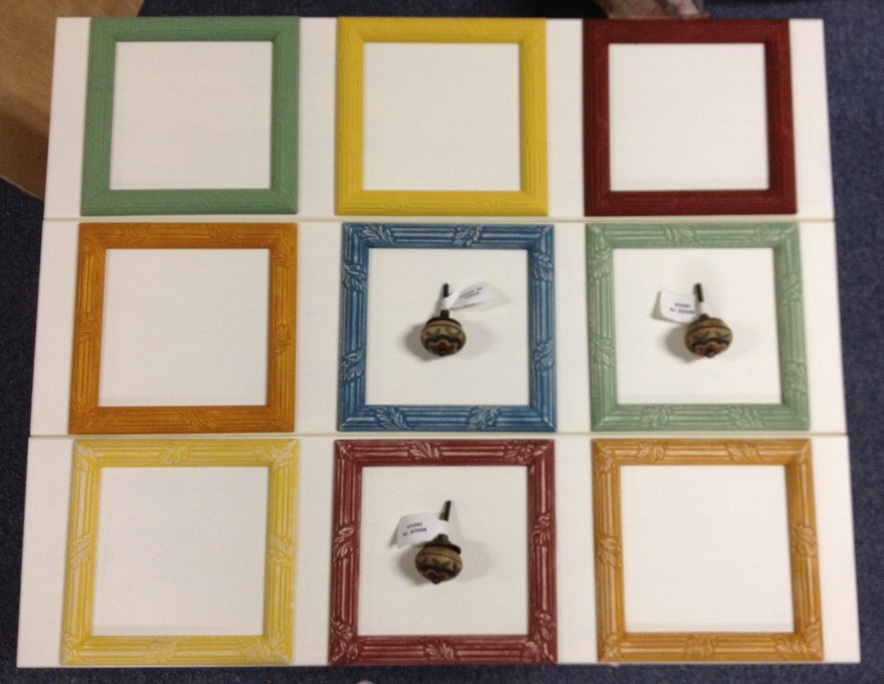
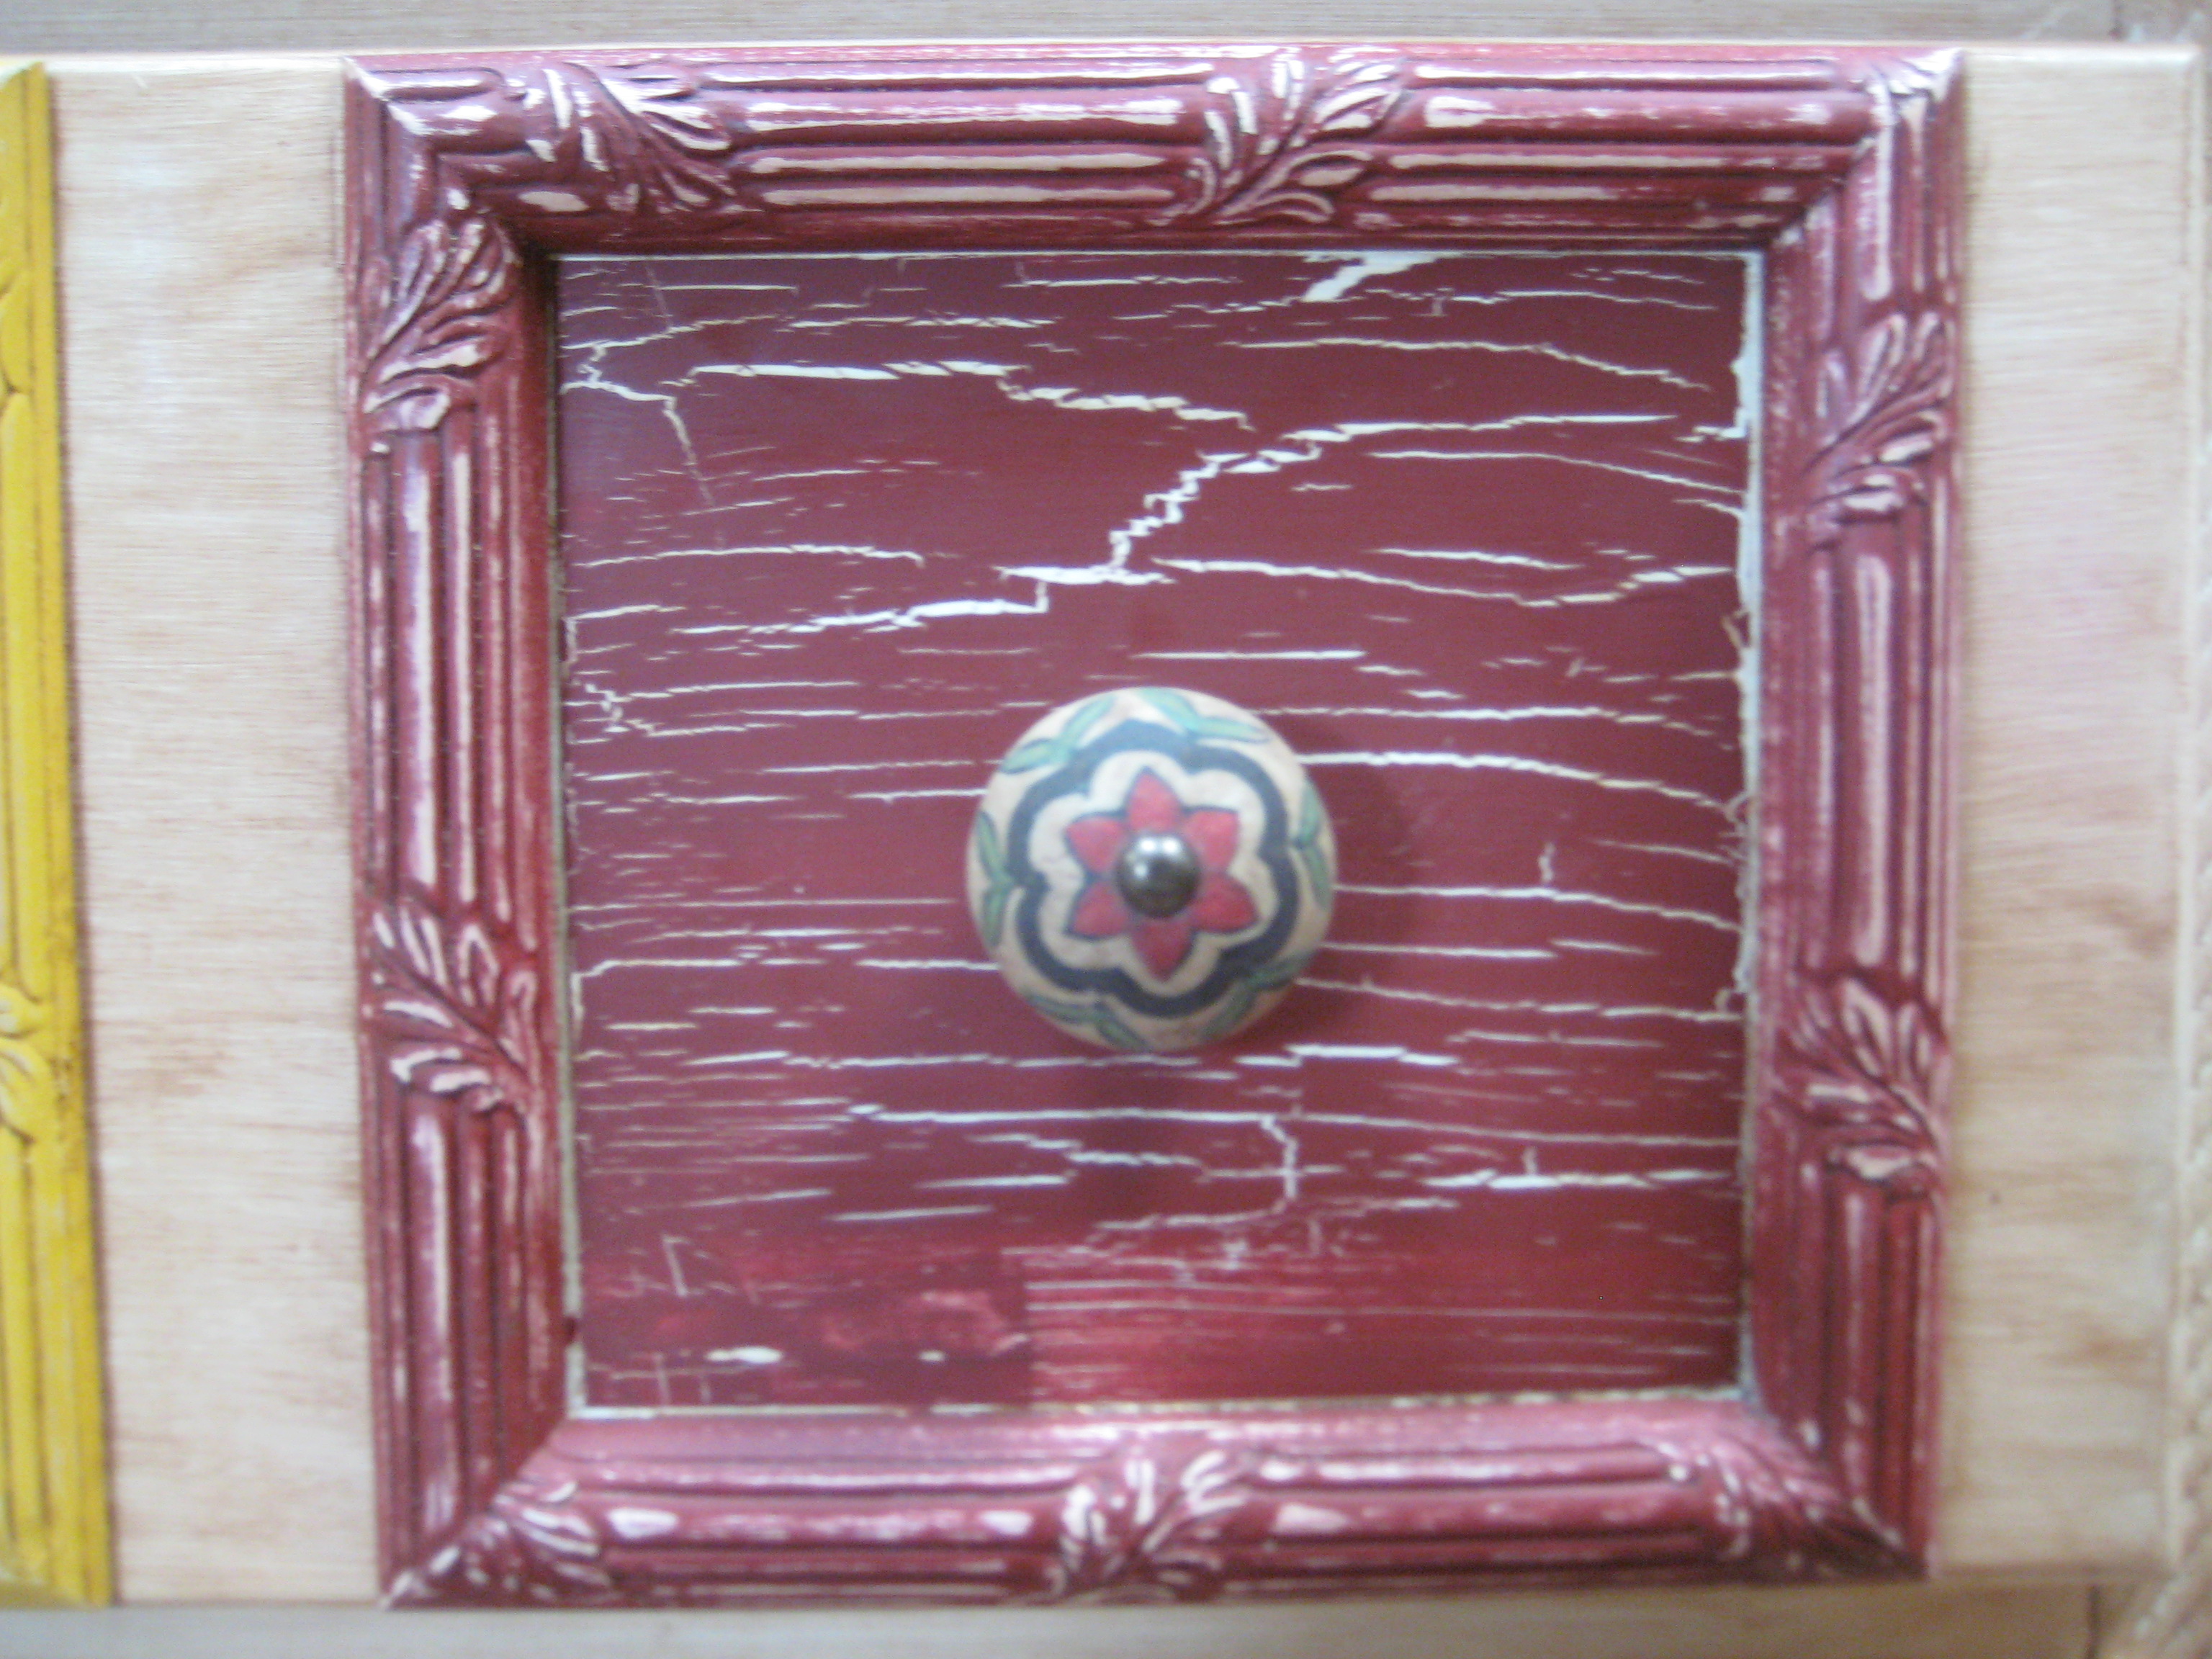
After applying a primer, the desk was painted with a cream colored latex paint. One coat of crackle glaze was applied to the drawer faces and then they were painted with some sage green paint I had left over from another project. To give it a little extra pizzazz, I also dipped the bottoms of the leg spindles with the same sage green.

Desk- Painted

I really like the look of painted furniture “aged” with dark wax, but I wasn’t able to find it in any of the local stores. And… because I was too IMPATIENT to order it online and wait for it to be delivered, I started scouring the wonderful “world wide web” for alternative solutions that would give me the same effect. A couple of sites had actually recommended SHOE POLISH PASTE… of all things!

Well… since I KNEW I could get my hands on that item, I decided to give it a try! I mean, what’s the worst thing that could happen, right?!? If I didn’t like it, then I would just start all over and repaint the desk… It’s not like I haven’t done THAT before!

It actually DID do a pretty good job of distressing the grooves and softening the look of the lighter paint color, but it was NOT a “FUN” task at all… in fact, I’m pretty sure I won’t ever use shoe wax again! Thankfully, I won’t have to because I’ve already added TWO dark wax mediums to my inventory 😉

Once the entire piece was waxed with a clear wax, the updated pulls were attached to the drawers, and TA DA!… a cute little console for somebody’s entryway!

Desk- After

All in all, I don’t think it turned out too bad, do you???

Please CLICK ON THE LINK ABOVE and LEAVE A MESSAGE to let me know what you think!

Enjoy!

Lynn

Delicious Baked Chicken Breasts

Hi everyone!

It’s What’s Cookin’? Wednesday!

I love chicken… it’s such a versatile “meat” that you can make a different chicken dish every night for a week and still not get tired of it!

We don’t generally have split chicken breasts as a main course because they always seem to come out dry… or at least they did… until I found this fantastic recipe that makes them tender, juicy, and full of flavor each and every time!

I’ve discovered that the key for “chicken success” is to brine the chicken first. Then, season the chicken and allow it to set in the refrigerator prior to baking. These extra steps make the prep for this dish a little more time consuming, but I think you’ll agree… it’s soooooo worth it!

Delicious Baked Chicken Breasts

Prep Time: 1 hour, 45 minutes

Cook/Bake Time: 45 minutes

Total Time: 2 hours, 30 minutes

Ingredients

    INGREDIENTS FOR BRINE
  • 1/4 cup kosher salt
  • 1/4 cup sugar
  • 2 quarts cold water
  • INGREDIENTS FOR BAKED CHICKEN BREASTS
  • 4 large bone-in chicken breast halves, with skin
  • 1/4 cup extra virgin olive oil
  • 1/2 teaspoon minced garlic
  • 1/4 teaspoon basil
  • 1/4 teaspoon rosemary
  • 1/4 teaspoon black pepper (either cracked or ground)
  • 1/2 teaspoon coarse sea salt
  • 1-2 cups chicken broth
  • Butter

Instructions

    INSTRUCTIONS FOR BRINE
  1. Remove "extra" fat from chicken and rinse chicken breasts under cold water.
  2. Dissolve salt and sugar in water, add chicken, cover (I usually use either a covered marinade dish or a gallon sized zip-lock bag).
  3. Refrigerate for 45 minutes, then rinse the chicken breasts and pat dry.
  4. INSTRUCTIONS FOR BAKED CHICKEN BREASTS
  5. After removing chicken from brine, arrange chicken breast halves in baking dish, bone side down.
  6. Combine basil, rosemary, black pepper, and sea salt in a small bowl (or an extra salt shaker).
  7. Pull skin back from each breast and sprinkle with spice mixture. Add a thin butter pat to each breast and replace skin.
  8. Rub outside of skin with olive oil and minced garlic.
  9. Add chicken broth to bottom of baking dish.
  10. Cover with foil and refrigerate for at least 45 minutes.
  11. Preheat oven to 375 degrees F.
  12. Bake chicken UNCOVERED in preheated oven until no longer pink and juices run clear (approximately 45 minutes, depending on your oven). If testing with a thermometer, the thickest part of the breast should read 165 degrees F.
  13. If you want a "crispier" skin, then place under the broiler for about 5-10 more minutes.
  14. Remove from oven and let chicken set under a foil tent for 5 minutes.
Schema/Recipe SEO Data Markup by Zip Recipes Plugin
http://thenonemptynest.com/delicious-baked-chicken-breasts/


If you prefer different spices to those in the ingredient list, then by all means… EXPERIMENT!

I think next time I might even try drizzling some lemon juice on top for a little extra “zest”. As long as you brine the chicken and place the spices under the skin to keep them from burning, then your chicken should be AMAZING!

Don’t forget to CLICK ON THE LINK ABOVE and LEAVE A COMMENT… I’d love to hear what you thought and what changes you made!

Enjoy…

Lynn

Table Talk

Hi everyone!

It’s Mommy Monday!

We’ve always had a tradition in our home
 we eat dinner together… as a family… at the table. That tradition started when my husband and I got married. In the beginning of our marriage, we both worked the afternoon shift and had the same schedule, so we always made it a point to have family time at the dinner table on our days off.

It was a great way to “catch up” and “keep up” with what was going on in their lives- and in their heads. It was also one of the few opportunities to corral all five kids together in the same room… at the same time… and without any arguments.

We continued this tradition when the twins came to live with us. This was a totally new concept for them, but it quickly became the one time of the day that they actually seemed to look forward to.

Needless to say, we’ve had some pretty interesting conversations with our first generation of kids over the years… like the time when our oldest son (I think he was about 14 at the time) informed us that he wouldn’t need to get a job when he grew up- because he wouldn’t have the need for money. He was going to be self-sufficient, living off the land… in an underground cave that he was going to “build”! Looking back, I kinda wish he would’ve followed through with that plan.

It was also at the dinner table that we were able to find out who was responsible for leading the pack when they all decided to climb out of an upper story bedroom window so they could take turns jumping off the roof!

But, NONE of those conversations could have ever prepared me for the conversations from this next generation!

One evening while my husband was at work, the boys decided to throw this one at me…

Jeff: Grandma?
Me: Yes, Jeff?
Jeff: Do you HAVE to be married to have a baby?
Me: (I was NOT expecting THAT subject to come up!) Ummmm… why would you ask that?
Jeff: Because someone from school said that people can have babies without getting married.
Me: Well… you SHOULD be married before you have a baby. (HOPEFULLY this will pacify him
)
Jeff: Oh
 so my mom and dad were married when we were born?
Me: (Uh oh!) Well… ummmm… no. They were living together when you were born, but they weren’t married.
Jeff: That doesn’t make any sense! Then how did my mom have a baby?
Me: (NOW what do I say?!?) Well… sometimes when two people are in love and living together, they have a baby.
Jeff: Oh… (Whew! I THOUGHT it was finally the end of the conversation
 but NOPE! Now his BROTHER decides to join in…)
James: Well… I heard that anyone can have a baby just by HUMPING!

REALLY?!? HUMPING?!? He’s TEN!!! Ugh!!!

And then there was the time when my son and his fiancée came to dinner one night


Jeff: Uncle Jared, do you get to keep your apartment forever or are you just paying rent for it?
Jared: I’m just renting it, why?
Jeff: I was just wondering if you got to keep it… you know… like a condom or something.

I know at least TWO of us nearly choked on our food! But then there was more…

Jeff: Uncle Jared… don’t forget you said that when I turn 21, you’re going to take me somewhere FUN… you know… a B-A-R (because apparently grandma doesn’t know how to spell?!?)!
Jared: I don’t know what you’re talking about (as he shoots me a shifty-eyed glance!)… I never said that (because apparently I’m also BLIND, as well!).
Me: Don’t worry- I won’t be around here when Jeff turns 21…
Jeff: Where WILL you be, grandma?
Me: Somewhere WARM AND SUNNY!!!
Jeff: Oh, I know where that is!
Me: You do, huh? Where do you think it is?
Jeff: HEAVEN!!!

You know, he could be right… at this rate I may die laughing!

Family time… it’s what’s for dinner 😉

Enjoy…

Lynn

Faux Apothecary 3-Drawer Dresser

Hi everyone!

It’s Fun Project Friday!

I was browsing through one of the local antique shops in town and found this small 3-drawer dresser. As soon as I saw it, I knew it had to come home with me! So I bought it…

3-Drawer Dresser- Before

3-Drawer Dresser- Before

I purchased the drawer pulls before I started painting, mainly because I wanted to match the paint to the knobs instead of trying to match the knobs to the paint.

Drawer Pull

Drawer Pull

The dresser was already stripped, so it really just needed a final sanding. I removed the wooden knobs, filled in the holes with wood putty, and gave it a good sanding. Once that was done, I primed everything with white primer.

3-Drawer Dresser- Primed

3-Drawer Dresser- Primed

And here’s where it got frustrating… I knew that I wanted to transform this piece into a faux apothecary chest. I did some research and it looked pretty easy, so I decided to give it a try. To get the 3 across-3 down pattern, I had to do some math to come up with the measurements for the frames.

I bought some really cool bamboo-looking trim at the local trim outlet. Then I began cutting the 90 degree angles to construct each frame. The PROBLEM was that I had only purchased three 8 foot pieces of this trim… which, unfortunately, was enough to construct just 8 frames… and I needed 9!

Naturally, I had chosen a trim design that was not one of their “stock” pieces, so I had to special order another one!

Two weeks later, I finally had all the frames cut and constructed. I chose the paint colors to match the knobs, then primed, painted, and distressed each one.

Next, I placed the frames on the drawers to get the correct spacing and traced the inside of each frame with a pencil. I ran painter’s tape along the pencil lines to mask off the inside squares, thinned down some dark acrylic paint with clear glaze, and used a cotton cloth to “wipe” it across the dresser and drawers. Once that was dry, I removed the tape and applied some crackle medium to the inside squares, then painted each square accordingly… to match the frame color.

Inside Frames

Inside Frames

I attached the frames to the drawer with glue and brads, drilled holes in the center of each color block, installed the new knobs, gave everything a good coat of paste wax, and


Frame and Knob

Frame and Knob

Voila! A faux apothecary 3-drawer dresser!

Faux Apothecary 3-Drawer Dresser

Faux Apothecary 3-Drawer Dresser

Pretty cool, huh?!?

I think the only thing I would do differently would be to use a MUCH darker paint color for the dresser and drawers (oh
 and to make sure I have enough trim BEFORE I start a project…) but other than that, I LOVE the way it turned out!

So… what do you think?!? Just CLICK ON THE LINK ABOVE and LEAVE A COMMENT!

Enjoy


Lynn

Sugar Cream Pie

Hi everyone!

It’s What’s Cookin’? Wednesday!

I was feeling a little nostalgic recently and suddenly developed a craving for a that pie my grandma used to make whenever I went to visit… she called it “Poor Man’s Pie”.

She would pour each of the ingredients directly into the pie shell and then let ME to do the FUN part… mix it all up… with my hands! Afterwards, we would put butter pats on top and bake it. I couldn’t wait for it to chill enough to “set up” so we could dig in… it was really good after dinner on a warm summer night.

I couldn’t remember the exact ingredients or measurements and had no idea which “safe place” I put her recipe, so I began searching the Internet to see if it was indeed an actual recipe, or just another one of her fabulous “creations”.

There were many different variations of a recipe called sugar cream pie, but one particular recipe seemed to be spot-on for the pie I fell in love with so many years ago. (It also happens to be the official pie for the State of Indiana!) I’ve made this a couple of times in the past few months, and my family LOVES it!

The main difference between this recipe and my grandma’s recipe is that her ingredients were all dumped into an unbaked pie shell, and this one uses a pre-baked shell. Obviously, that meant that hers baked a little longer, but it sure does taste exactly the way I remember! I can still hear her say, “careful now… mustn’t tear the shell” as I was blending the ingredients together… but, of course, that’s usually what ended up happening anyway 😉

Sugar Cream Pie

Prep Time: 20 minutes

Cook/Bake Time: 20 minutes

Total Time: 40 minutes

Ingredients

  • Single crust 9" pastry pie shell (I STILL have not been able to master the art of making my own pie shells :( )
  • 1 cup sugar
  • 1/4 cup cornstarch
  • 2 cups milk (I used 2% and it came out just fine)
  • 1/2 cup butter, sliced
  • 1 teaspoon vanilla extract
  • 1/4 teaspoon ground cinnamon

Instructions

  1. Preheat oven and bake your pie shell according to the directions on the package or your pie crust recipe. Cool on wire rack when crust is light brown.
  2. Reduce oven temperature to 375 degrees F.
  3. Stir sugar and cornstarch together in a large saucepan.
  4. Slowly stir in milk until smooth. Bring to a boil, then reduce heat.
  5. Cook and stir for 2 minutes or until it's thick and bubbly.
  6. Remove from heat; add butter and vanilla. Stir until most of the butter is melted.
  7. Pour mixture into pre-baked pie crust and sprinkle with cinnamon.
  8. Bake for 15-20 minutes or until pie is golden brown.
  9. Cool on a wire rack and then refrigerate until completely chilled. (It's best to let it sit overnight in the refrigerator, but should be ready to cut in about 4-5 hours.

Notes

If the pie "runs" when you slice it, it either didn't cook long enough, or it didn't chill long enough... but, you could always just eat it with a spoon!

Schema/Recipe SEO Data Markup by Zip Recipes Plugin
http://thenonemptynest.com/sugar-cream-pie/

This is absolutely one of the best pies I’ve ever had! Try it, and see if you like it!

Don’t forget to CLICK ON THE LINK ABOVE to LEAVE A COMMENT and let me know what you think!

Enjoy…

Lynn

Ugh! The Monster is Back!

Hi everyone!

It’s Mommy Monday!

Well
 the pre-pubescent monster is back and has been rearing its ugly head in our household for quite some time now. Apparently it isn’t enough that for the past 7 years we’ve been dealing with a laundry list of “issues” that came packaged with our two walking and talking bundles of joy
 so why not throw some wacked out hormones in the mix to make it really interesting?!?

After dinner one night last week, the oldest twin was being his usual “charming” self. It’s a rare occurrence for him to go more than 15 minutes at any given time without an inappropriate or rude comment, a mouthful of sass, name-calling, or bickering spewing out of his mouth.

Right now we’re in the “stupid” phase
 everything anyone says or does is STUPID! His doctors, his teachers, his parents/grandparents, his siblings
 doesn’t matter. Everything we say, everything we do, every explanation we give
 is STUPID! If it wasn’t said or done by one of his “friends”… then it’s stupid!

At 11 years old, he knows it all
 and can DO it all better than anyone else. He’s one of those children who make it very difficult to “choose your battles”, because EVERYTHING is a battle. I would gladly trade 1:00 a.m., 3:00 a.m., AND 5:00 a.m. feedings with this stage any day of the week!

Well, last week was no exception. It had already been a long day and I had just had enough, so I threw out one of those totally meaningless “mommy threats”. You know- the “if you don’t quit making those faces, your face is gonna freeze like that”, or the “if you’re not in the car when I’m ready to go, then I’m leaving without you!” kind of threats
 except I told him, “you know, they have a special place for kids who act like you do
 if you don’t knock it off, I’m gonna make a reservation for you!”

It was actually quiet in our house
 for a few seconds
 until his twin brother piped up and said


“Yeah, like BOOTY CAMP!”

Well
 there went all of MY credibility! Apparently it’s hard for a child to take you seriously when you’re laughing your ass off


Enjoy


Lynn

Shabby Vanity Bench

Hi everyone!

It’s Fun Project Friday!

I found this little bench at a rummage sale about 10 years ago (yes… TEN!). It was pretty solid, not at all wobbly, but definitely needed some TLC. The price was right, so I brought it home and finally removed the seat and sanded the finish down about 6 months later.

And that’s how it sat…

in storage…

for nearly 10 years!

Shabby vanity bench seat- Before

Shabby vanity bench seat- Before

Shabby vanity bench- before

Shabby vanity bench- before

Honestly, I don’t even know why I bought this bench… I had no purpose for it… no need for it… and no idea what I was going to do with it. But, when you’re a project junkie like I am, none of that matters! I saw what I liked, at a price I was willing to pay, and brought it home.

Well… I finally decided to drag this poor bench out of storage and give it the new life it deserved. Since it was already stripped (the HARD part!), all I had to do to prep it was give it a good cleaning. Once that was done, I primed it, gave it a fresh coat of paint, applied an antiquing glaze, and distressed it.

The dirty and worn out fabric and batting were removed from the seat and replaced with 2″ foam, fresh batting, and a piece of upholstery fabric that I found at Goodwill.

I couldn’t believe this was the SAME bench!

My husband is happy because this is one less thing in his “space”… and I’M happy because I actually competed another project!

I love the new look, don’t you?!?

Shabby vanity bench- After

Shabby vanity bench- After

Click on the link above to LEAVE A COMMENT and let me know what you think!

Enjoy…

Lynn

Stuffed Green Peppers

Hi everyone!

It’s What’s Cookin’? Wednesday!

I have to admit… I’ve never been a fan of stuffed peppers. I always loved the filling, but would never actually eat the pepper because they always seemed to taste so bitter. That’s probably why stuffed peppers have never been a “regular” on the dinner menu in our house.

Last year my husband and I decided to try our hand at gardening… again. He loves green peppers, so naturally we put in a few plants. Little did I know that we were going to end up with a TON of green peppers… more than I thought we would EVER use! So, rather than pawning the majority of them off on friends and family, I researched recipes and decided to give stuffed peppers another chance.

Boy am I glad I did, because these stuffed peppers are absolutely amazing (even the pepper)!!!

Stuffed Green Peppers

Ingredients

  • 6 green bell peppers
  • 2 lb. ground beef
  • 3/4 cup chopped onion
  • 1/2 cup diced sweet peppers
  • Celery salt
  • Pepper
  • Oregano
  • 1 (14.5) can diced tomatoes, chopped
  • 3 T Worcestershire sauce
  • 1 cup uncooked rice
  • 2 beef bullion cubes
  • 1-2 cups shredded cheddar and/or mozzarella cheese
  • 2 cups tomato juice OR spaghetti sauce (your preference)

Instructions

  1. Bring a large pot of salted water to a boil. Cut the tops off the peppers and remove seeds. Cook peppers in the boiling water for 5 minutes, then drain. Cut 2 or 3 slits in the bottom of each pepper to allow for any grease drainage. SALT THE INSIDE OF EACH PEPPER (This is KEY because it removes the bitter taste from the pepper), and sprinkle a little bit of cheese in the bottom of each pepper.
  2. In a medium sized microwave safe bowl, combine uncooked rice with 1 cup of water and the beef bullion cubes. Cover with plastic wrap and cook according to the directions on the box (or bag). Half-way through the cooking process, remove from the microwave and CAREFULLY remove the plastic wrap (that steam gets HOT!). Stir with a fork to distribute the bullion flavor. Re-cover and return to microwave for the remaining cooking time. Fluff with fork and set aside. The rice and beef bullion mixture gives the hamburger SUCH a good flavor!
  3. In a large skillet, saute the beef, onions and sweet peppers until beef is browned. Drain the excess fat and season with celery salt, pepper and oregano (to taste). Stir in the diced tomatoes, rice and Worcestershire sauce. Cover and simmer for about 5 minutes. Remove from heat, and stir in about 1 cup of shredded cheese.
  4. Preheat the oven to 350 degrees F. Stuff each salted pepper with the beef mixture and place them open side up in a baking dish. Pour the tomato juice OR spaghetti sauce over the peppers.
  5. Cover with foil and bake for approximately 25 minutes.
  6. Remove from oven and sprinkle a little cheese over each pepper. Return to oven for 5-10 minutes, or until cheese is melted.
Schema/Recipe SEO Data Markup by Zip Recipes Plugin
http://thenonemptynest.com/stuffed-green-peppers/

I always have enough filling to completely STUFF 10-12 half peppers AND fill up a quart sized bag to freeze for later (which will usually fill up another 6 half peppers or so). Last year we planted 3 or 4 green bell pepper plants… this year we have 26 (still not quite sure how THAT happened)! I guess I’ll be looking for some more recipes… 😉

Don’t forget to click on the link above to LEAVE A COMMENT and LET ME KNOW WHAT YOU THINK!

Enjoy…

Lynn

Here’s Your Sign!

Hi everyone!

It’s Mommy Monday!

Have you ever found yourself in a situation where you feel like it’s just another routine day, and then… WHAM! …your face suddenly feels flush, you get this funny feeling in the pit of your stomach, and you just want to RUN back to your comfort zone?!? Well that’s what happened to me the other day!

I was sitting in the vet’s office with my cat this weekend when I had a sudden flashback to one of my most embarrassing “Here’s Your Sign” moments…

A couple of weeks after we moved into our new home, my son, Jared, and I were outside cleaning the pool when a young stray cat wandered up to where we were standing. I thought it was a little strange that we had never even seen this cat before, yet it showed no fear or hesitation
 it just strutted over to us like it knew who we were
 like it had come home.

I still can’t explain why, but for some reason this cat’s personality immediately reminded me of my oldest son, Charlie, who passed away unexpectedly the summer before we moved… needless to say, his passing turned my world upside down and sideways. Charlie had an amazing sense of humor and was very good at pulling pranks… I think I was his favorite “victim”. I’m almost positive he spent the entire year planning April Fool’s Day pranks for me… and I fell for them… every…single…year!

Anyway… after a few days, it was apparent that this stray animal wasn’t going to leave, so naturally Jared tried his hardest to convince me that we NEEDED a cat
.

HA! Been there, done that! I can’t even begin to count the number of stray pets that my kids have brought home over the years! I was really thinking about getting another dog after we’d settled in, but I told him I would think about it.

I guess I wasn’t thinking fast enough, so… taking full advantage of the fact that it’s common knowledge I’m out-hormoned by all the testosterone in our home, he used the “But it’s a FEMALE, mom!” angle. Okay
 fine
 I relented
 once again… but only on the condition that the cat wouldn’t be allowed to come in the house until after a visit to the vet.

A few days later I dropped the cat off to be immunized, spayed, and declawed, and then ran a couple errands. And that’s when it happened… the vet called as I was on my way home to tell me that she had just begun the spay procedure and had some interesting information to pass on.

I immediately envisioned that a litter of kittens was in our future
 been there, done that, too
 ugh! But, NOPE, that wasn’t it…

I don’t think there is anything that could’ve made me feel more stupid than when the vet told me that SHE (the cat… not the vet) was actually a HE… and had already been neutered!

Sheesh! I never thought to “gender-check” the cat myself- I relied totally on Jared’s observation and his knowledge of basic anatomy…

Not only did I hear a little voice in my head that said “Here’s Your Sign”, but I swear I also heard one saying “April Fools, Mom”!

I eventually got over the embarrassment, but I’ll admit… I was a little concerned about Jared dating…

Enjoy…

Lynn

Lighted Glass Blocks

Hi everyone!

It’s Fun Project Friday!

I LOVE lighted glass blocks! If you have a Cricut (or similar personal cutting system), then the creative possibilities are endless- they’re fairly inexpensive to make, really quick to put together, and make great gifts for those hard-to-buy-for people in your life…co-workers, bus drivers, teachers, neighbors, friends and family!

Here are a few of my favorites…

BELIEVE Glass Block

BELIEVE Glass Block

LOVE OF FAMILY Glass Block

LOVE OF FAMILY Glass Block

HEAVEN Glass Block

HEAVEN Glass Block

All I did was clean and dry the block, spray with clear frosted spray paint, cut out and apply the vinyl, insert lights, and then add the ribbon and embellishments!

Simple… simple… simple!!!

An there you have it… a beautiful glass block for your home (or someone else’s) created for under $15.00 and in less than 3 hours! Don’t ya love it?!?

CLICK ON THE LINK ABOVE and LEAVE A COMMENT… I’d love to hear what you think!

Enjoy!

Lynn